Category Archives: Explanations
This is the area where stuff is explained but not like walked through or shown or anything. It’s a reading area if you want to know stuff that I talk about.
Leroy Jenkins
How many of you use Jenkins or even know what it is? Well, I’ve been running into it quite a bit lately and I found a few ways of using it to gain access to other servers within an enterprise or organization. From the Jenkins website (https://wiki.jenkins-ci.org/display/JENKINS/Meet+Jenkins)
Jenkins is an award-winning application that monitors executions of repeated jobs, such as building a software project or jobs run by cron. Among those things, current Jenkins focuses on the following two jobs:
- Building/testing software projects continuously, just like CruiseControl or DamageControl. In a nutshell, Jenkins provides an easy-to-use so-called continuous integration system, making it easier for developers to integrate changes to the project, and making it easier for users to obtain a fresh build. The automated, continuous build increases the productivity.
- Monitoring executions of externally-run jobs, such as cron jobs and procmail jobs, even those that are run on a remote machine. For example, with cron, all you receive is regular e-mails that capture the output, and it is up to you to look at them diligently and notice when it broke. Jenkins keeps those outputs and makes it easy for you to notice when something is wrong.
Jenkins is actually a great tool and I love using it now! What is fun and interesting about Jenkins or Hudson (the predecessor to Jenkins) is the ability to use a groovy script console located on the server as well as all slave nodes. This is done from the Jenkins server script console url, http://jenkins-server/script. This will vary per instance but whatever url brings up the Jenkins dashboard just add a /script to it and you get the script console. From here you can do anything you can do with Groovy script. What can this buy you? Well, you can access the os with some script, you can poll jobs, you can do all sorts of things. Here’s what the dashboard looks like:

Back to Leroy here, well, Leroy Jenkins automates the whole process. It simplifies the scripting by providing you with a console to run whatever commands you want remotely and on any nodes available. It is available on my github. You can download it by running git clone https://www.github.com/captainhooligan/Leroy-Jenkins.git.
Here’s Leroy’s interface:

Cisco VPN Client in BT5r3
Recently I came across an issue where I needed to be able to connect to a Cisco VPN using certificate authentication from my Backtrack 5 box. Usually I just use vpnc and go about my day but this time I couldn’t because this vpn was configured for only certificate based authentication. After searching for quite some time on installing the vpnclient software from Cisco I realized the software was last built for the 2.6.24 kernel. This isn’t helpful as Backtrack 5 uses the 3.2.6 kernel. Needless to say this made life pretty painful. I have patched the most recent release of the Cisco vpnclient and have written a bash script to run the installation so hopefully nobody else has to deal with my pain. Here’s how to use it:
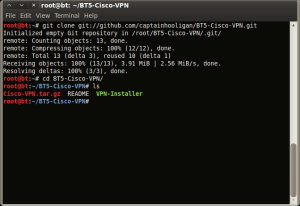
1. Download the files from my github by either going to the site and downloading or just running a git clone.

2. Change to the BT5-Cisco-VPN directory that was created during the git clone process and verify you have all the files shown.
3. Now is where we start setting up the VPN! Here we run the VPN-Installer script with ./VPN-Installer and follow the on screen instructions. There are only a few questions that are asked. Locations can easily be left default. The part that I change from default is when asked whether or not the service for the vpnclient is to start automatically on boot. I choose No because I prefer to manage it myself.

From here everything is pretty self explanatory for the installation.

Here is the startup of the script.

Directory where binaries are to be installed question.

This is what it looks like while compiling.
4. Now we have to start the vpn service and configure our client. To start the service the command is /etc/init.d/vpnclient_init start.

5. Configuration. This part varies depending on your setup. What I like to do is copy my config from a Windows box that has the VPN configuration already. This can be done manually quite easily if you know what every option means and what the options are. Using a configuration from a Windows machine that works means all options are correct and the configuration works. To copy from Windows go to your Windows machine and copy the configuration from C:\Program Files\Cisco Systems\VPN Client\Profiles\’your config’.pcf. The location on our Backtrack machine we place this configuration file is /etc/opt/cisco-vpnclient/Profiles/. Unfortunately I don’t have a screen shot for you here but if you’ve made it this far you can handle it.
6. Edit the .pcf file to change the line: “CertStore=2” to “CertStore=1”. This tells the vpnclient that the certificate store is not going to be the Microsoft Certificate Store ( the 2 option ) but the Cisco Certificate Store ( the 1 option ).
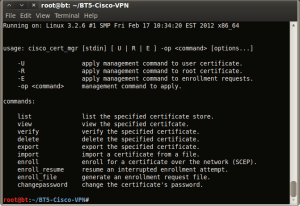
7. Ensure certificates are loaded. Depending on your organization your certificates will vary. If using Microsoft issued certs or Microsoft PKI the user certificate that you will want to load will be your Digital Signature certificate. This is done via the “cisco_cert_mgr” command. Running this without any switches shows you the options.
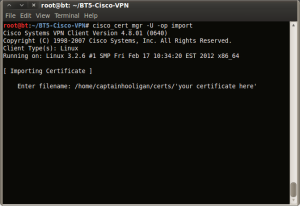
To load your user certificate the command is “cisco_cert_mgr -U -op import”. Then we follow the onscreen instructions and tell the application the path to our certificate. Be patient as this application does take some time to get going.
This process will need to be repeated for any custom root certificates but instead of the -U option the -R option will be used.
8. Now we have to verify the certificates were loaded correctly and are valid. This is just another one line command : “cisco_cert_mgr -U -op verify”. Then we follow the screen instructions as before. I always do this with both the User certs and Root certs before I connect for the first time just to be 100% sure all certificates are in place.
9. Connect! To connect our vpn we simply run “vpnclient connect xxxx” The xxxx here is the name of your configuration profile. If your config file is named my-config.pcf you would just type “vpn connect my-config”. Once the VPN connects press [Ctrl] + [z] and then bg. This will background the vpnclient and you can continue on your way.
Hope this helps everyone!
Welcome
Welcome to my tutorial on information security.
Here I will go over exploiting systems from mobile platforms to enterprise networks. We will begin with some explanations of what is an exploit and so forth up to the more advanced stuff. Of course if you want to jump around that’s ok too.
I’m very open to suggestions as well as people who would like to provide content so if anyone is interested please let me know!
As you can see from the menus this blog is going to cover the entire process of a penetration test, tools that are of interest, how-tos, and a bunch of information that I come up with. I will do my best to keep myself from hopping up on a soap box and ranting off about absolutely nothing at all. The tools page is going to linked to manufacture’s pages for the tool or a very good tutorial on said tool. I’m not going to reinvent the wheel here and give you my take on something that has already been done probably better than I can myself. The penetration testing process will be the way I go about a penetration test. Every single pentester I’ve met goes about things in his or her own way so don’t take what I put there as law.
Enjoy!
